Getting started with GTM Server-Side tracking
Jakob Twedmark
VD

We at Motillo believe that GTM Server-side tracking is a powerful tool and recommend that those who are not using it consider the benefits. In this article we explain why.
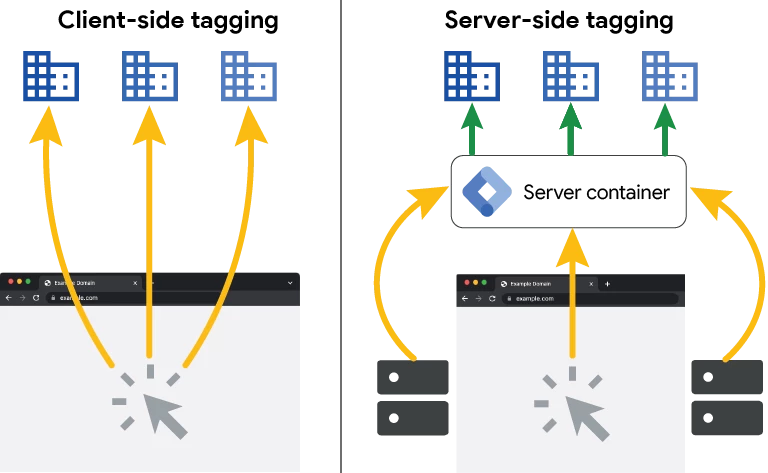
GTM Server-side tracking is a feature in Google Tag Manager that makes it possible to run tracking code directly on the server. This has several advantages compared to a traditional GTM setup running on the client side, i.e. in the user's browser.
With Google Tag Manager Server-side it is possible to improve the performance, security and data quality of website tracking. For example, you can use a tag to identify users who block cookies, and this information can then be used to customise tracking for those users.
Benefits of GTM Server-side
- Better performance: By running tracking code directly on the server, the user's browser does not need to download and execute the code. This can lead to faster load times and a better user experience.
- Increased security: Tracking code running on the client side can be vulnerable to attacks. By running the code on the server, the risk of data being stolen or manipulated can be reduced.
- Better data quality: Tracking code running on the client side can be blocked by users who use ad or cookie blockers. By running the code on the server, data can be collected about all users, regardless of whether they use these blockers.
How do you implement GTM Server-side?
To implement GTM Server-side you first need to install a "server container" on your web server. The server container is a small piece of code that runs the tracking code. When a user visits the website, data is sent from the server container to Google Tag Manager. Once you have installed the server container, you can start configuring your tags in the same way as with traditional GTM.
Step-by-step guide for implementing GTM Server-side
After implementation on the server, the following steps should be carried out in Google Tag Manager to complete and verify the setup.
1. Create a GTM server container
- Go to your GTM account and click "Admin" in the left side menu.
- Click the "Plus" icon and select "Create Container".
- Select "Server" as the target platform and enter a container name.
- Click "Create" to continue.
2. Create a tracking server manually
- In the next step, select "Manually provision tagging server" and copy the Container Config string.
- You can choose to provision the server as a preview server or a production server.
3. Configure the URL for the server container in GTM
- Go back to the "Admin" section in your GTM server container.
- Click on "Container settings".
- Click "Add url" and paste in the URL for your server.
- Click "Save" to update the container settings.
4. Test the server container
- If everything is set up correctly on the server, you can test the setup using the "preview" function in GTM.
- If the test is successful, you will see a message indicating that the container is ok.
Feel free to contact us at Motillo and we will help you get started.
More information: https://developers.google.com/tag-platform/tag-manager/server-side/manual-setup-guide